9.4. How to get help
All DataLad errors or problems you encounter during DataLad-101 are intentional
and serve illustrative purposes. But what if you run into any DataLad errors
outside of this course?
Fortunately, the syllabus has a whole section on that, and on
one lazy, warm summer afternoon you flip through it.

You realize that you already know the most important things: The number one advice on how to get help is “Read the error message”. The second advice it “I’m not kidding: Read the error message”. The third advice, finally, says “Honestly, read the f***ing error message”.
9.4.1. Help yourself
If you run into a DataLad problem and you have followed the three steps above, but the error message does not give you a clue on how to proceed, the first you should do is
find out which version of DataLad you use
read the help page of the command that failed
The first step is important in order to find out whether a
command failed due to using a wrong DataLad version. In order
to use this book and follow along, your DataLad version
should be datalad-0.18 or higher, for example.
To find out which version you are using, run
$ datalad --version
datalad 0.19.3
If you want a comprehensive overview of your full setup,
datalad wtf (manual)[1] is the command to turn to. Running this command will
generate a report about the DataLad installation and configuration.
The output below shows an excerpt.
$ datalad wtf
# WTF
## configuration <SENSITIVE, report disabled by configuration>
## credentials
  - keyring:
    - active_backends:
      - PlaintextKeyring with no encyption v.1.0 at /home/me/.local/share/python_keyring/keyring_pass.cfg
    - config_file: /home/me/.config/python_keyring/keyringrc.cfg
    - data_root: /home/me/.local/share/python_keyring
## datalad
This lengthy output will report all information that might be relevant – from DataLad to git-annex or Python up to your operating system.
The second step, finding and reading the help page of the command in question, is important in order to find out how the command that failed is used. Are arguments specified correctly? Does the help list any caveats?
There are multiple ways to find help on DataLad commands.
You could turn to the documentation.
Alternatively, to get help right inside the terminal,
run any command with the -h/--help option (shown
as an excerpt here):
$ datalad get --help
Usage: datalad get [-h] [-s LABEL] [-d PATH] [-r] [-R LEVELS] [-n]
                   [-D DESCRIPTION] [--reckless [auto|ephemeral|shared-...]]
                   [-J NJOBS] [--version]
                   [PATH [PATH ...]]

Get any dataset content (files/directories/subdatasets).

This command only operates on dataset content. To obtain a new independent
dataset from some source use the CLONE command.

By default this command operates recursively within a dataset, but not
across potential subdatasets, i.e. if a directory is provided, all files in
the directory are obtained. Recursion into subdatasets is supported too. If
enabled, relevant subdatasets are detected and installed in order to
fulfill a request.

NOTE
  Power-user info: This command uses git annex get to fulfill
  file handles.

*Examples*

Get a single file::

   % datalad get <path/to/file>

Get (clone) a registered subdataset, but don't retrieve data::

   % datalad get -n <path/to/subds>

positional arguments:
  PATH                  path/name of the requested dataset component. The
                        component must already be known to a dataset. To add
                        new components to a dataset use the ADD command.
                        Constraints: value must be a string or value must be
                        NONE

-✂--✂-
This, for example, is the help page on datalad get (manual), the same you would find in the documentation, but in your terminal (here heavily trimmed to only show the main components).
It contains a command description, a list
of all the available options with a short explanation of them, and
example commands. The two arguments sections provide a comprehensive
list of command arguments with details on their possibilities and
requirements. A first thing to check would be whether your command call
specified all of the required arguments.
An additional source of information is the PsyInf knowledge base. It contains a curated collection of solutions and workarounds that have not yet made it into other documentation.
9.4.2. Asking questions (right)
If nothing you do on your own helps to solve the problem,
consider asking others. Check out neurostars
and search for your problem – likely,
somebody already encountered the same error before
and fixed it, but if not, just ask a new question with a datalad tag.
Make sure your question is as informative as it can be for others. Include
context – what did you want to do and why?
the problem – post the error message, and provide the steps necessary to reproduce it. Do not shorten the error message, unless it contains sensitive information.
technical details – what version of DataLad are you using, what version of git-annex, and which git-annex repository type, what is your operating system and – if applicable – Python version?
datalad wtfis your friend to find all of this information.
9.4.3. Debugging like a DataLad-developer
If you have read a command’s help from start to end, checked all software versions twice, even asked colleagues to reproduce your problem (unsuccessfully), and you still don’t have any clue what is going on, then welcome to the debugging section!

Fig. 9.1 It’s not as bad as this
It is not always straightforward to see why a particular DataLad command has failed. Given that operations with DataLad can be quite complicated, and could involve complexities such as different forms of authentication, different file systems, interactions with the environment, configurations, and other software, and much more, there are what may feel like an infinite amount of sources for the problem at hand. The resulting error message, however, may not display the underlying cause correctly because the error message of whichever process failed is not propagated into the final result report.
In situations where there is no obvious reason for a command to fail, it can be helpful – either for yourself or for further information to include in GitHub issues – to start debugging, or logging at a higher granularity than is the default. This allows you to gain more insights into the actions DataLad and its underlying tools are taking, where exactly they fail, and to even play around with the program at the state of the failure.
Debugging and logging are not as complex as these terms may sound if you have never consciously debugged.
Procedurally, it can be as easy as adding an additional flag to a command call, and cognitively, it can be as easy as engaging your visual system in a visual search task for the color red or the word “error”, or reading more DataLad output than you are used to. We will start with the general concepts, and then collect concrete debugging strategies for different problems.
9.4.3.1. Logging
In order to gain more insights into the steps performed by a program and capture as many details as possible for troubleshooting an error, you can turn to logging.
Logging simply refers to the fact that DataLad and its underlying tools tell you what they are doing:
This information can be coarse, such as a mere [INFO] Downloading <some_url> into <some_target>, or fine-grained, such as [DEBUG] Resolved dataset for status reporting: <dataset>.
The log level in brackets at the beginning of the line indicates how many details DataLad shares with you.
Note that logging is not a sealed book, and happens automatically during the execution of any DataLad command.
While you were reading the handbook, you have seen a lot of log messages already.
Anything printed to your terminal preceded by [INFO], for example, is a log message (in this case, on the info level).
When you are consciously logging, you simply set the log-level to the desired amount of information, or increase the amount of verbosity until the output gives you a hint of what went wrong.
Likewise, adjusting the log-level also works the other way around, and lets you decrease the amount of information you receive in your terminal.
Log levels
Log levels provide the means to adjust how much information you want, and are described in human readable terms, ordered by the severity of the failures or problems reported. The following log levels can be chosen from:
critical: Only catastrophes are reported. Currently, there is nothing inside of DataLad that would log at this level, so setting the log level to critical will result in getting no details at all, not even about errors or failures.
error: With this log level you will receive reports on any errors that occurred within the program during command execution.
warning: At this log level, the command execution will report on usual situations and anything that might be a problem, in addition to report anything from the error log level. .
info: This log level will include reports by the program that indicate normal behavior and serve to keep you up to date about the current state of things, in additions to warning and error logging messages.
debug: This log level is very useful to troubleshoot a problem, and results in DataLad telling you a lot about what it is doing.
Other than log levels, you can also adjust the amount of information provided with numerical granularity. Instead of specifying a log level, provide an integer between 1 and 50, with lower values denoting more debugging information.
Raising the log level (e.g, to error, or 40) will decrease the amount of information and output you will receive, while lowering it (e.g., to debug or 10) will increase it.
Setting a log level can be done in the form of an environment variable, a configuration, or with the -l/--log-level flag appended directly after the main datalad command.
To get extensive information on what datalad status (manual) does underneath the hood, your command could look like this (but its output is shortened):
$ datalad --log-level debug status
[DEBUG] Resolved dataset to report status: /home/me/dl-101/DataLad-101
[DEBUG] Done query repo: ['ls-files', '--stage', '-z', '--exclude-standard', '-o', '--directory', '--no-empty-directory']
[DEBUG] Done AnnexRepo(/home/me/dl-101/DataLad-101/recordings/longnow).get_content_info(...)
[DEBUG] Run ['git', '-c', 'diff.ignoreSubmodules=none', '-c', 'core.quotepath=false', 'ls-files', '-z', '-m', '-d'] (protocol_class=GeneratorStdOutErrCapture) (cwd=/home/me/dl-101/DataLad-101/recordings/longnow)
[DEBUG] AnnexRepo(/home/me/dl-101/DataLad-101/recordings/longnow).get_content_info(...)
[DEBUG] Query repo: ['ls-tree', 'HEAD', '-z', '-r', '--full-tree', '-l']
[DEBUG] Run ['git', '-c', 'diff.ignoreSubmodules=none', '-c', 'core.quotepath=false', 'ls-tree', 'HEAD', '-z', '-r', '--full-tree', '-l'] (protocol_class=GeneratorStdOutErrCapture) (cwd=/home/me/dl-101/DataLad-101/recordings/longnow)
[DEBUG] Done query repo: ['ls-tree', 'HEAD', '-z', '-r', '--full-tree', '-l']
[DEBUG] Done AnnexRepo(/home/me/dl-101/DataLad-101/recordings/longnow).get_content_info(...)
nothing to save, working tree clean
… and how does it look when using environment variables or configurations?
The log level can also be set (for different scopes) using the datalad.log.level configuration variable, or the corresponding environment variable DATALAD_LOG_LEVEL.
To set the log level for a single command, for example, set it in front of the command:
$ DATALAD_LOG_LEVEL=debug datalad status
And to set the log level for the rest of the shell session, export it:
$ export DATALAD_LOG_LEVEL=debug
$ datalad status
$ ...
You can find out a bit more on environment variable in the Findoutmore on environment variables.
The configuration variable can be used to set the log level on a user (global) or system-wide level with the git config (manual) command:
$ git config --global datalad.log.level debug
This output is extensive and detailed, but it precisely shows the sequence of commands and arguments that are run prior to a failure or crash, and all additional information that is reported with the log levels info or debug can be very helpful to find out what is wrong.
Even if the vast amount of detail in output generated with debug logging appears overwhelming, it can make sense to find out at which point an execution stalls, whether arguments, commands, or datasets reported in the debug output are what you expect them to be, and to forward all information into any potential GitHub issue you will be creating.
Finally, other than logging with a DataLad command, it sometimes can be useful to turn to git-annex or Git for logging.
For failing datalad get calls, it may be useful to retry the retrieval using git annex get -d -v <file> (manual), where -d (debug) and -v (verbose) increase the amount of detail about the command execution and failure.
In rare cases where you suspect something might be wrong with Git, setting the environment variables GIT_TRACE and GIT_TRACE_SETUP to 2 prior to running a Git command will give you debugging output.
9.4.3.2. Debugging
If the additional level of detail provided by logging messages is not enough, you can go further with actual debugging.
For this, add the --dbg or --idbg flag to the main datalad command, as in datalad --dbg status.
Adding this flag will enter a Python or IPython debugger when something unexpectedly crashes.
This allows you to debug the program right when it fails, inspect available variables and their values, or step back and forth through the source code.
Note that debugging experience is not a prerequisite when using DataLad – although it is an exciting life skill.
The official Python docs provide a good overview on the available debugger commands if you are interested in learning more about this.
9.4.3.3. Debugging: A concrete example
It is common for datalad get errors to originate in git-annex, the software used by DataLad to transfer data. Here are a few suggestions to debug them:
Take a deep breath, or preferably a walk in a nice park :)
- Check that you are using a recent version of git-annex
git-annex versionreturns the version of git-annex on the first line of its input, and it is also reported in the output ofdatalad wtf.The version number contains the release date of the version in use. For instance, git-annex version:
8.20200330-g971791563was released on 30 March 2020.If the version that you are using is older than a few months, consider updating using the instructions in Installation and configuration.
Try to download the file using
git-annex get -v -d <file_name>. If this doesn’t succeed, the DataLad command may not succeed. Options-d/--debugand-vare here to provide as much verbosity in error messages as possibleRead the output of git-annex, identify the error, breathe again, and solve the issue!
9.4.4. Common warnings and errors
A lot of output you will see while working with DataLad originates from warnings or errors by DataLad, git-annex, or Git. Some of these outputs can be wordy and not trivial to comprehend - and even if everything works, some warnings can be hard to understand. This following section will list some common git-annex warnings and errors and attempts to explain them. If you encounter warnings or errors that you would like to see explained in this book, please let us know by filing an issue.
9.4.4.1. Output produced by Git
Unset Git identity
If you have not configured your Git identity, you will see warnings like this when running any DataLad command:
[WARNING] It is highly recommended to configure git first (set both user.name and user.email) before using DataLad.
To set your Git identity, go back to section Initial configuration.
Rejected pushes
One error you can run into when publishing dataset contents is that your
datalad push (manual) to a sibling is rejected.
One example is this:
$ datalad push --to public
 [ERROR  ] refs/heads/main->public:refs/heads/main [rejected] (non-fast-forward) [publish(/home/me/dl-101/DataLad-101)]
This example is an attempt to push a local dataset to its sibling on GitHub. The
push is rejected because it is a non-fast-forward merge situation. Usually,
this means that the sibling contains changes that your local dataset does not yet
know about. It can be fixed by updating from the sibling first with a
datalad update --merge (manual).
Here is a different push rejection:
$ datalad push --to roommate
 publish(ok): . (dataset) [refs/heads/git-annex->roommate:refs/heads/git-annex 023a541..59a6f8d]
 [ERROR  ] refs/heads/main->roommate:refs/heads/main [remote rejected] (branch is currently checked out) [publish(/home/me/dl-101/DataLad-101)]
 publish(error): . (dataset) [refs/heads/main->roommate:refs/heads/main [remote rejected] (branch is currently checked out)]
 action summary:
   publish (error: 1, ok: 1)
As you can see, the git-annex branch was pushed successfully, but updating
the main branch was rejected: [remote rejected] (branch is currently checked out) [publish(/home/me/dl-101/DataLad-101)].
In this particular case, this is because it was an attempt to push from DataLad-101
to the roommate sibling that was created in chapter Collaboration.
This is a special case of pushing, because it – in technical terms – is a push
to a non-bare repository. Unlike bare Git repositories, non-bare
repositories cannot be pushed to at all times. To fix this, you either want to
checkout another branch
in the roommate sibling or push to a non-checked out branch in the roommate
sibling. Alternatively, you can configure roommate to receive the push with
Git’s receive.denyCurrentBranch configuration key. By default, this configuration
is set to refuse. Setting it to updateInstead
with git config receive.denyCurrentBranch updateInstead will allow updating
the checked out branch. See git configs
man page entry
on receive.denyCurrentBranch for more.
Detached HEADs
One warning that you may encounter during an installation of a dataset is:
[INFO ] Submodule HEAD got detached. Resetting branch main to point to 046713bb. Original location was 47e53498
Even though “detached HEAD” sounds slightly worrisome, this is merely an information and does not require an action from your side. It is related to Git submodules (the underlying Git concept for subdatasets), and informs you about the current state a subdataset is saved in the superdataset you have just cloned.
9.4.4.2. Output produced by git-annex
Unusable annexes
Upon installation of a dataset, you may see:
[INFO    ]     Remote origin not usable by git-annex; setting annex-ignore
[INFO    ]     This could be a problem with the git-annex installation on the
remote. Please make sure that git-annex-shell is available in PATH when you
ssh into the remote. Once you have fixed the git-annex installation,
run: git annex enableremote origin
This warning lets you know that git-annex will not attempt to download content from the remote “origin”. This can have many reasons, but as long as there are other remotes you can access the data from, you are fine.
A similar warning message may appear when adding a sibling that is a pure Git remote, such as a repository on GitHub:
[INFO ] Failed to enable annex remote github, could be a pure git or not
accessible
[WARNING] Failed to determine if github carries annex. Remote was marked by
annex as annex-ignore. Edit .git/config to reset if you think that was done
by mistake due to absent connection etc
These messages indicate that the sibling github does not carry an annex.
Thus, annexed file contents cannot be pushed to this sibling. This happens
if the sibling indeed does not have an annex (which would be true, for example,
for siblings on GitHub, GitLab, Bitbucket, …, and
would not require any further action or worry), or
if the remote could not be reached, e.g., due to a missing internet
connection (in which case you could set the key annex-ignore in
.git/config to false).
Speaking of remotes that are not available, this will probably be one of the most
commonly occurring git-annex errors to see - failing datalad get calls
because remotes are not available:
9.4.5. Other errors
Sometimes, registered subdatasets URLs have an SSH instead of https address, for example git@github.com:datalad-datasets/longnow-podcasts.git instead of https://github.com/datalad-datasets/longnow-podcasts.git.
If one does not have an SSH key configured for the required service (e.g., GitHub, or a server), installing or getting the subdataset and its contents fails, with messages starting similar to this:
[INFO   ] Cloning https://github.com/psychoinformatics-de/paper-remodnav.git/remodnav [2 other candidates] into '/home/.../remodnav'
Permission denied (publickey).
If you encounter these errors, make sure to create and/or upload an SSH key (see section Walk-through: Dataset hosting on GIN for an example) as necessary, or reconfigure/edit the URL into a HTTPS URL.
git-annex as the default branch on GitHub
If you publish a dataset to GitHub, but the resulting repository seems to consist of cryptic directories instead of your actual file names and directories, GitHub may have made the git-annex branch the default.
Typically, you can change the default branch settings in the webinterface to fix this.
Windows adds whitespace line-endings to unchanged files
The type of line ending (a typically invisible character that indicates a line break) differs between operating system. While Linux and macOS use a line feed (LF), Windows uses carriage return + line feed (CRLF). When you only collaborate across operating systems of the same type, this is a very boring fun fact at most. But if Windows- and Non-Windows users collaborate, or if you are working with files across different operating systems, the different type of line ending that Windows uses may show up as unintended modifications on other system. In most cases, this is prevented by a default cross-platform compatible line-ending configuration on Windows that is set during installation:
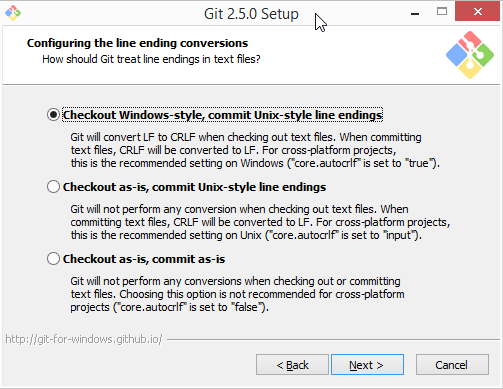
To fix this behavior outside of the installation process and standardize line endings across operating systems, Windows users are advised to set the configuration core.autcrlf true with git config --global core.autocrfl true.
Footnotes