8.2. Publishing datasets to Git repository hosting
Because DataLad datasets are Git repositories, it is possible to push datasets to any Git repository hosting service, such as GitHub, GitLab, Gin, Bitbucket, Gogs, or Gitea. These published datasets are ordinary siblings of your dataset, and among other advantages, they can constitute a back-up, an entry-point to retrieve your dataset for others or yourself, the backbone for collaboration on datasets, or the means to enhance visibility, findability and citeability of your work1. This section contains a brief overview on how to publish your dataset to different services.
8.2.1. Git repository hosting and annexed data
As outlined in a number of sections before, Git repository hosting sites typically do not support dataset annexes - some, like gin however, do.
Depending on whether or not an annex is supported, you can push either only your Git history to the sibling, or the complete dataset including annexed file contents.
You can find out whether a sibling on a remote hosting services carries an annex or not by running the datalad siblings command.
A +, -, or ? sign in parenthesis indicates whether the sibling carries an annex, does not carry an annex, or whether this information isn’t yet known.
In the example below you can see that a public GitHub repository https://github.com/psychoinformatics-de/studyforrest-data-phase2 does not carry an annex on github (the sibling origin), but that the annexed data are served from an additional sibling mddatasrc (a special remote with annex support).
Even though the dataset sibling on GitHub does not serve the data, it constitutes a simple, findable access point to retrieve the dataset, and can be used to provide updates and fixes via pull requests, issues, etc.
# a clone of github/psychoinformatics/studyforrest-data-phase2 has the following siblings:
$ datalad siblings
.: here(+) [git]
.: mddatasrc(+) [http://psydata.ovgu.de/studyforrest/phase2/.git (git)]
.: origin(-) [git@github.com:psychoinformatics-de/studyforrest-data-phase2.git (git)]
There are multiple ways to create a dataset sibling on a repository hosting site to push your dataset to.
8.2.2. How to add a sibling on a Git repository hosting site: The manual way
Create a new repository via the webinterface of the hosting service of your choice. It does not need to have the same name as your local dataset, but it helps to associate local dataset and remote siblings.
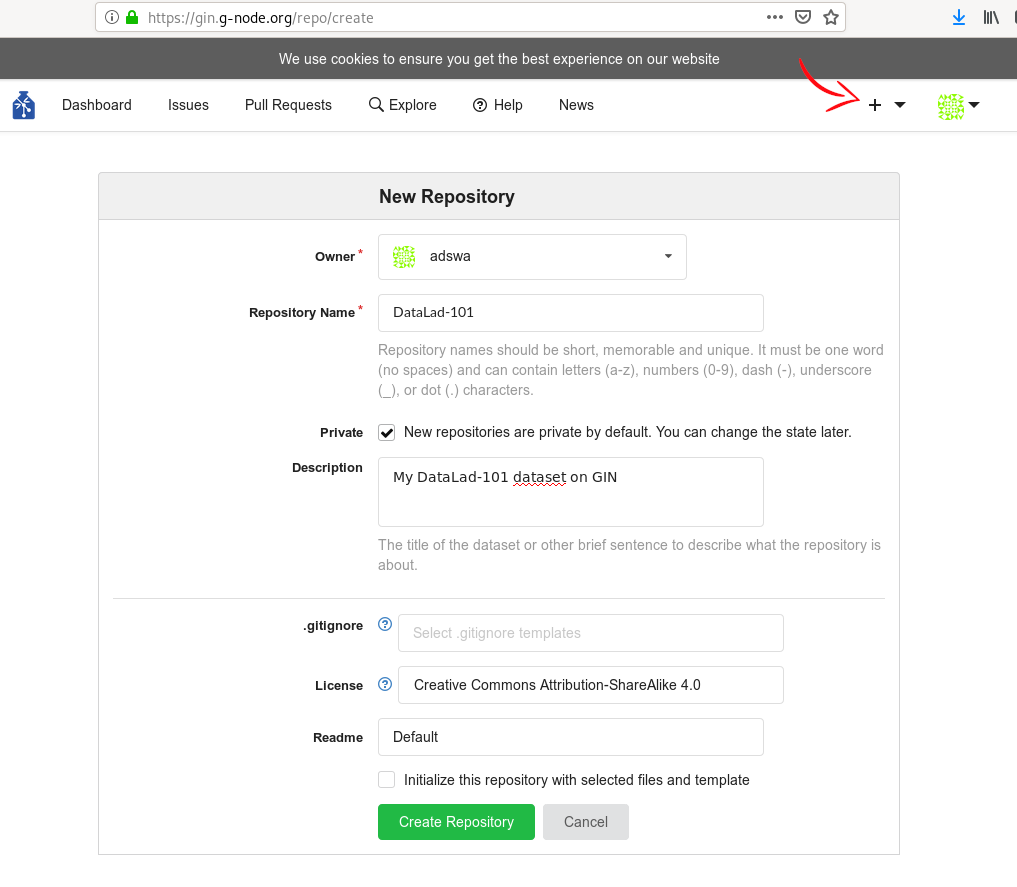
Fig. 8.4 Webinterface of gin during the creation of a new repository.
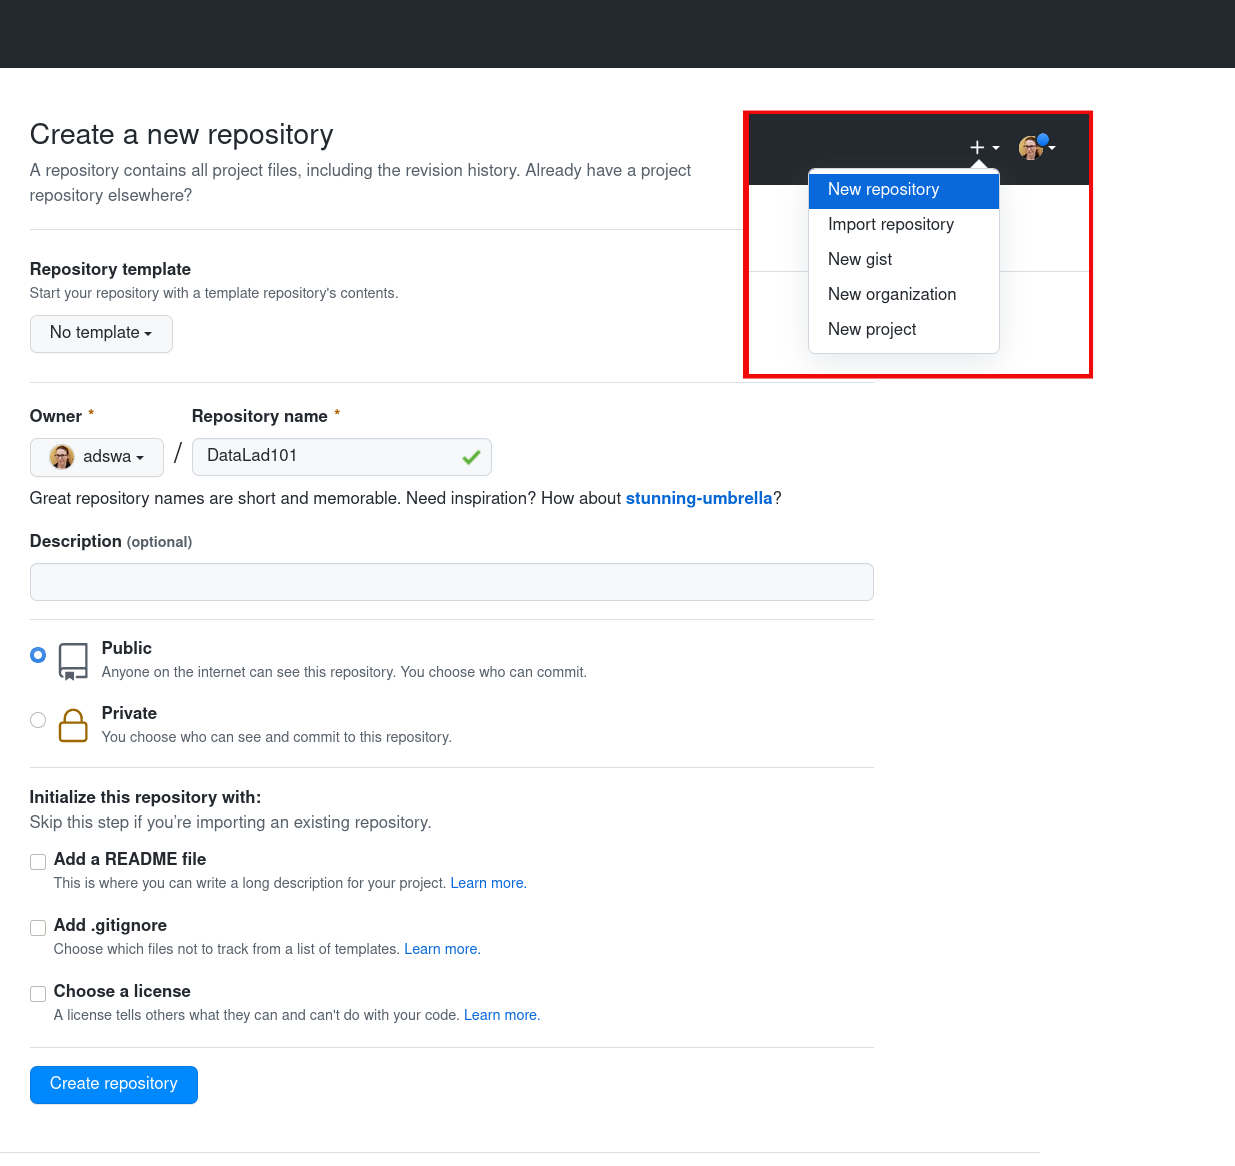
Fig. 8.5 Webinterface of github during the creation of a new repository.
Afterwards, copy the SSH or HTTPS URL of the repository. Usually, repository hosting services will provide you with a convenient way to copy it to your clipboard. An SSH URL takes the form
git@<hosting-service>:/<user>/<repo-name>.gitand an HTTPS URL takes the formhttps://<hosting-service>/<user>/<repo-name>.git. The type of URL you choose determines whether and how you will be able topushto your repository. Note that many services will require you to use the SSH URL to your repository in order to do push operations, so make sure to take the SSH and not the HTTPS URL if this is the case.If you pick the SSH URL, make sure to have an SSH key set up. This usually requires generating an SSH key pair if you do not have one yet, and uploading the public key to the repository hosting service.
What is an SSH key and how can I create one?
An SSH key is an access credential in the SSH protocol that can be used to login from one system to remote servers and services, such as from your private computer to an SSH server. For repository hosting services such as GIN, GitHub, or GitLab, it can be used to connect and authenticate without supplying your username or password for each action.
This tutorial by GitHub
is a detailed step-by-step instruction to generate and use SSH keys for authentication,
and it also shows you how to add your public SSH key to your GitHub account
so that you can install or clone datasets or Git repositories via SSH (in addition
to the http protocol), and the same procedure applies to GitLab and Gin.
Don’t be intimidated if you have never done this before – it is fast and easy:
First, you need to create a private and a public key (an SSH key pair).
All this takes is a single command in the terminal. The resulting files are
text files that look like someone spilled alphabet soup in them, but constitute
a secure password procedure.
You keep the private key on your own machine (the system you are connecting from,
and that only you have access to),
and copy the public key to the system or service you are connecting to.
On the remote system or service, you make the public key an authorized key to
allow authentication via the SSH key pair instead of your password. This
either takes a single command in the terminal, or a few clicks in a web interface
to achieve.
You should protect your SSH keys on your machine with a passphrase to prevent
others – e.g., in case of theft – to log in to servers or services with
SSH authentication2, and configure an ssh agent
to handle this passphrase for you with a single command. How to do all of this
is detailed in the above tutorial.
Use the URL to add the repository as a sibling. There are two commands that allow you to do that; both require you give the sibling a name of your choice (common name choices are
upstream, or a short-cut for your user name or the hosting platform, but its completely up to you to decide):git remote add <name> <url>datalad siblings add --dataset . --name <name> --url <url>
Push your dataset to the new sibling:
datalad push --to <name>
8.2.3. How to add a sibling on a Git repository hosting site: The automated way
DataLad provides create-sibling-* commands to automatically create datasets on certain hosting sites.
DataLad versions 0.16.0 and higher contain more of these commands, and provide a more streamlined parametrization.
Please read the paragraph that matches your version of DataLad below, and be mindful of a change in command arguments between DataLad versions 0.15.x and 0.16.x.
8.2.3.1. Using DataLad version < 0.16.0
If you are using DataLad version below 0.16.0, you can automatically create new repositories from the command line for GitHub and GitLab using the commands datalad create-sibling-github and datalad create-sibling-gitlab.
Due to the different representation of repositories on the two sites, the two commands are parametrized differently, and it is worth to consult each command’s manpage or --help, but below are basic usage examples for the two commands:
GitLab:
Using datalad create-sibling-gitlab is easiest with a python-gitlab configuration.
Please consult the python-gitlab documentation for details, but a basic configuration in the file ~/.python-gitlab.cfg can look like this:
[global]
default = gitlab
ssl_verify = true
timeout = 5

[gitlab]
url = https://gitlab.myinstance.com
private_token = <super-secret-token>
api_version = 4
This configures the default GitLab instance (here, we have called it gitlab) with a specific base URL and the user’s personal access token for authentication.
Note that you will need to generate and retrieve your own personal access token under the profile settings of the gitlab instance of your choice (see the paragraph on authentication tokens below for more information).
With this configuration, the --site parameter can identify the GitLab instance by its name gitlab.
If you have an SSH key configured, it is useful to specify --access as ssh – this saves you the need to authenticate with every push:
$ datalad create-sibling-gitlab \
  -d . \                     # current dataset
  --site gitlab \            # to the configured GitLab instance
  --project DataLad-101 \    # repository name
  --layout flat \
  --access ssh               # optional, but useful
     create_sibling_gitlab(ok): . (dataset)
     configure-sibling(ok): . (sibling)
     action summary:
       configure-sibling (ok: 1)
       create_sibling_gitlab (ok: 1)
$ datalad siblings
  here(+) [git]
      jugit(-) [git@gitlab.myinstance.com:<user>/<repo>.git (git)]
$ datalad push --to gitlab
     publish(ok): . (dataset)
     action summary:
       publish (ok: 1)
GitHub: The command datalad create-sibling-github requires a personal access token from GitHub (see the paragraph on authentication tokens below for more information). When you are using it for the first time, you should be queried interactively for it. Subsequently, your token should be stored internally.
By default, the URL that is set up for you is an HTTPS URL.
If you have an SSH key configured, it is useful to specify --access-protocol as ssh – with this the SSH URL is configured, saving you the need to authenticate with every push.
$ datalad create-sibling-github \
  -d . \                            # current dataset
  DataLad-101 \                     # repository name
  --access-protocol ssh             # optional, but useful
You need to authenticate with 'github' credentials. https://github.com/settings/tokens provides information on how to gain access
token: <my-super-secret-token>
create_sibling_github(ok): . (dataset) [Dataset sibling 'github', project at https://github.com/adswa/DataLad-101.git]
configure-sibling(ok): . (sibling)
action summary:
  configure-sibling (ok: 1)
  create_sibling_github (ok: 1)
$ datalad push --to github
publish(ok): . (dataset)
action summary:
  publish (ok: 1)
8.2.3.2. Using DataLad version 0.16.0 and higher
Starting with DataLad version 0.16.0 or higher, you can automatically create new repositories from the command line for GitHub, GitLab, gin, Gogs, or Gitea.
This is implemented with a new set of commands called create-sibling-github, create-sibling-gitlab, create-sibling-gin, create-sibling-gogs, and create-sibling-gitea.
Get DataLad features ahead of time by installing from a commit
If you want to get this feature ahead of the 0.16.0 release, you can install the most recent version of the master branch or a specific commit hash from GitHub, for example with
$ pip install git+git://github.com/datalad/datalad.git@master
When getting features ahead of time, your feedback is especially valuable. If you find that something does not work, or if you have an idea for improvements, please get in touch.
Each command is slightly tuned towards the peculiarities of each particular platform, but the most important common parameters are streamlined across commands as follows:
[REPONAME](required): The name of the repository on the hosting site. It will be created under a user’s namespace, unless this argument includes an organization name prefix. For example,datalad create-sibling-github my-awesome-repowill create a new repository undergithub.com/<user>/my-awesome-repo, whiledatalad create-sibling-github <orgname>/my-awesome-repowill create a new repository of this name under the GitHub organization<orgname>(given appropriate permissions).-s/--name <name>(required): A name under which the sibling is identified. By default, it will be based on or similar to the hosting site. For example, the sibling created withdatalad create-sibling-githubwill be calledgithubby default.--credential <name>(optional): Credentials used for authentication are stored internally by DataLad under specific names. These names allow you to have multiple credentials, and flexibly decide which one to use. When--credential <name>is the name of an existing credential, DataLad tries to authenticate with the specified credential; when it does not yet exist DataLad will prompt interactively for a credential, such as an access token, and store it under the given<name>for future authentications. By default, DataLad will name a credential according to the hosting service URL it used for, for exampledatalad-api.github.comas the default for credentials used to authenticate against GitHub.--access-protocol {https|ssh|https-ssh}(defaulthttps): Whether to use SSH or HTTPS URLs, or a hybrid version in which HTTPS is used to pull and SSH is used to push. Using SSH URLs requires an SSH key setup, but is a very convenient authentication method, especially when pushing updates – which would need manual input on user name and token with everypushover HTTPS.--dry-run(optional): With this flag set, the command will not actually create the target repository, but only perform tests for name collisions and report repository name(s).--private(optional): A switch that, if set, makes sure that the created repository is private.
Other streamlined arguments, such as --recursive or --publish-depends allow you to perform more complex configurations, for example publication of dataset hierarchies or connections to special remotes. Upcoming walk-throughs will demonstrate them.
Self-hosted repository services, e.g., Gogs or Gitea instances, have an additional required argument, the --api flag.
It needs to point to the URL of the instance, for example
$ datalad create-sibling-gogs my_repo_on_gogs --api "https://try.gogs.io"
8.2.4. Authentication by token
To create or update repositories on remote hosting services you will need to set up appropriate authentication and permissions. In most cases, this will be in the form of an authorization token with a specific permission scope.
8.2.4.1. What is a token?
Personal access tokens are an alternative to authenticating via your password, and take the form of a long character string, associated with a human-readable name or description.
If you are prompted for username and password in the command line, you would enter your token in place of the password3.
Note that you do not have to type your token at every authentication – your token will be stored on your system the first time you have used it and automatically reused whenever relevant.
How does the authentication storage work?
Passwords, user names, tokens, or any other login information is stored in your system’s (encrypted) keyring. It is a built-in credential store, used in all major operating systems, and can store credentials securely.
You can have multiple tokens, and each of them can get a different scope of permissions, but it is important to treat your tokens like passwords and keep them secret.
8.2.4.2. Which permissions do they need?
The most convenient way to generate tokens is typically via the webinterface of the hosting service of your choice. Often, you can specifically select which set of permissions a specific token has in a drop-down menu similar (but likely not identical) to this screenshot from GitHub:
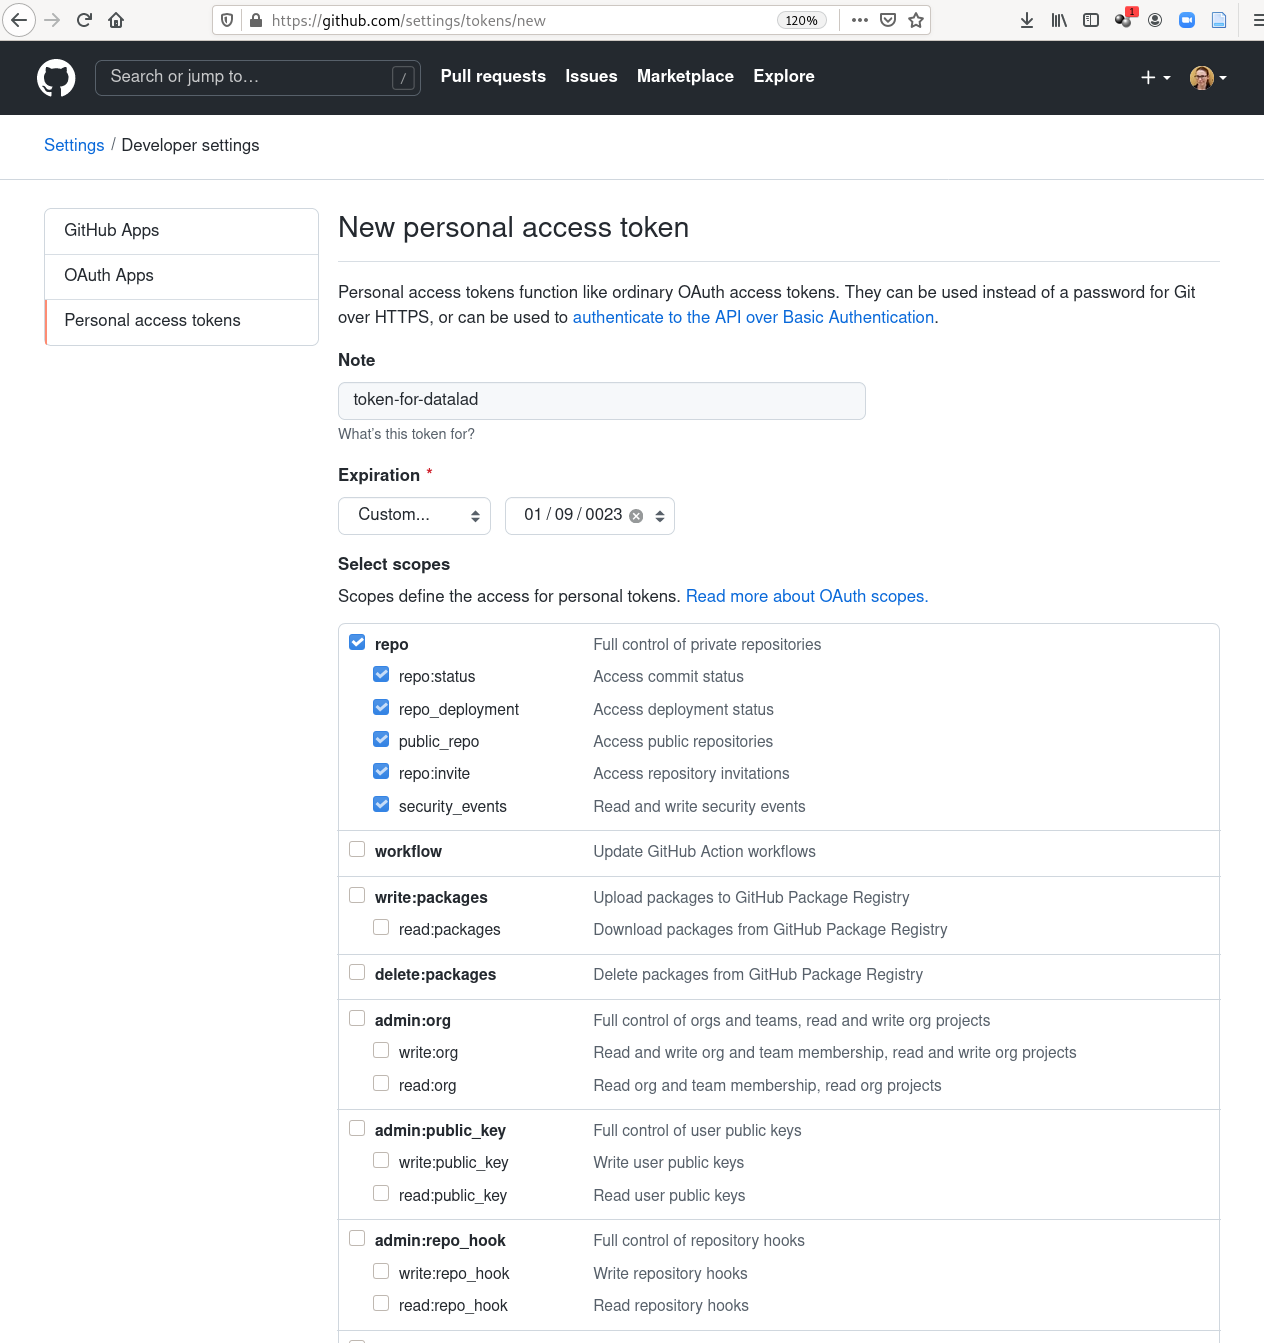
Fig. 8.6 Webinterface to generate an authentication token on GitHub. One typically has to set a name and permission set, and potentially an expiration date.
For creating and updating repositories with DataLad commands it is usually sufficient to grant only repository-related permissions. However, broader permission sets may also make sense. Should you employ GitHub workflows, for example, a token without “workflow” scope could not push changes to workflow files, resulting in errors like this one:
[remote rejected] (refusing to allow a Personal Access Token to create or update workflow `.github/workflows/benchmarks.yml` without `workflow` scope)]
Footnotes
- 1
Many repository hosting services have useful features to make your work citeable. For example, gin is able to assign a DOI to your dataset, and GitHub allows
CITATION.cfffiles. At the same time, archival services such as Zenodo often integrate with published repositories, allowing you to preserve your dataset with them.- 2
Your private SSH key is incredibly valuable, and it is important to keep it secret! Anyone who gets your private key has access to anything that the public key is protecting. If the private key does not have a passphrase, simply copying this file grants a person access!
- 3
GitHub deprecated user-password authentication and only supports authentication via personal access token from November 13th 2020 onwards. Supplying a password instead of a token will fail to authenticate.