7.4. DataCat - a shiny front-end for your dataset
Dependency note
This section depends on datalad-catalog version 1.1.1 or later.
If you’re looking for ways to showcase your datasets, look no further than the datalad-catalog extension. This extension takes your favorite datasets and metadata, and generates a static website from it.

For quick access to more resources, have a look at:
A 3-minute explainer video
The source repository for an up-to-date overview of functionality
Below, a step-by-step tutorial to generate your own catalog
7.4.1. Why DataCat?
Working collaboratively with large and distributed datasets poses particular challenges for FAIR data access, browsing, and usage:
the administrative burden of keeping track of different versions of the data, who contributed what, where/how to gain access, and representing this information centrally and accessibly can be significant
data privacy regulations might restrict data from being shared or accessed across multi-national sites
costs of centrally maintained infrastructure for data hosting and web-portal type browsing could be prohibitive
Such challenges impede the many possible gains obtainable from distributed data sharing and access. Decisions might even be made to forego FAIR principles in favor of saving time, effort and money, leading to the view that these efforts have seemingly contradicting outcomes.
DataLad Catalog helps counter this apparent contradiction by focusing on interoperability with structured, linked, and machine-readable metadata.

Metadata about datasets, their file content, and their links to other datasets can be used to create abstract representations of datasets that are separate from the actual data content. This means that data content can be stored securely while metadata can be shared and operated on widely, thus improving decentralization and FAIRness.
7.4.2. How does it work?
DataLad Catalog can receive commands to create a new catalog, add and remove metadata entries to/from an existing catalog, serve
an existing catalog locally, and more. Metadata can be provided to DataLad Catalog from any number of arbitrary metadata sources,
as an aggregated set or as individual items/objects. DataLad Catalog has a dedicated schema (using the JSON Schema vocabulary)
against which incoming metadata items are validated. This schema allows for standard metadata fields as one would expect for datasets of any kind
(such as name, doi, url, description, license, authors, and more), as well as fields that support identification, versioning,
dataset context and linkage, and file tree specification.
The process of generating a catalog, after metadata entry validation, involves:
aggregation of the provided metadata into the catalog file tree, and
generating the assets required to render the user interface in a browser.

The output is a set of structured metadata files, as well as a Vue.js-based browser interface that understands how to render this metadata in the browser. What is left for the user is to host this content on their platform of choice and to serve it for the world to see!
7.4.3. The DataLad-based workflow
The DataLad ecosystem provides a complete set of free and open source tools that, together, provide full control over dataset/file access and distribution, version control, provenance tracking, metadata addition/extraction/aggregation, and catalog generation.

DataLad itself can be used for decentralized management of data as lightweight, portable and extensible representations.
DataLad MetaLad can extract structured high- and low-level metadata and associate it with these datasets or with individual files.
And at the end of the workflow, DataLad Catalog can turn the structured metadata into a user-friendly data browser.
DataLad Catalog also operates independently
Since it provides its own schema in a standard vocabulary, any metadata that conforms to this schema can be submitted to the tool in order to generate a catalog. Metadata items do not necessarily have to be derived from DataLad datasets, and the metadata extraction does not have to be conducted via DataLad MetaLad. Even so, the provided set of tools can be particularly powerful when used together in a distributed (meta)data management pipeline.
7.4.4. Step-by-Step
7.4.4.1. Installing DataLad Catalog
Let’s dive into it and create our own catalog! We’ll start by creating and activating a new and empty virtual environment:
$ python -m venv my_catalog_env
$ source my_catalog_env/bin/activate
Then we can install datalad-catalog with pip. This process will also install datalad and other dependencies:
$ pip install datalad-catalog
After that, you can check the installation by running the datalad catalog command with the --help flag:
$ datalad catalog --help
Usage: datalad catalog [-h] [--version]

Generate a user-friendly web-based data catalog from structured
metadata.

``datalad catalog`` can be used to ``-create`` a new catalog,
``-add`` and ``-remove`` metadata entries to/from an existing catalog,
At this stage, you might be wondering why the catalog command is preceded by datalad as in datalad catalog.
DataLad Catalog is an extension of DataLad, which provides base functionality that the catalog generation process uses.
It is installed as a dependency during the installation of DataLad Catalog, and provides supporting functionality during
the catalog generation process.
7.4.4.2. The main catalog functionality
As you likely saw in the --help information, DataLad Catalog has several main commands to support
the process of catalog generation. These include catalog-:
create: create a new catalogadd: add metadata entries to a catalogremove: remove metadata entries from a catalogserve: serve the catalog locally on an http server for testing purposesvalidate: validate metadata according to the catalog schemaset: set catalog properties, such as the dataset that will be displayed as the catalog’shomepageget: get catalog properties, such as the catalog’s configurationtranslate: translate a metalad-extracted metadata item from a particular source structure into the catalog schemaworkflow: run a multi-step workflow for recursive metadata extraction, translating metadata to the catalog schema, and adding the translated metadata to a new catalog
7.4.4.3. Creating a new catalog
With the catalog-create command, you can create a new catalog. Let’s try it out!
$ datalad catalog-create --catalog data-cat
catalog_create(ok): data-cat [Catalog successfully created at: data-cat]
The catalog create(ok) result shows that the catalog was successfully created at the specified location (./data-cat),
which was passed to the command with the -c/--catalog flag.
Now we can inspect the catalog’s content with the tree command:
$ tree -L 1 data-cat
data-cat
├── artwork
├── assets
├── config.json
├── index.html
├── metadata
├── README.md
├── schema
└── templates

5 directories, 3 files
As you can see, the catalog’s root directory contains subdirectories for:
artwork: images that make the catalog prettyassets: mainly the JavaScript and CSS code that underlie the user interface of the catalog.metadata: this is where metadata content for any datasets and files rendered by the catalog will be containedschema: a copy of the schema files that metadata entries of this catalog conform totemplates: HTML templates used for rendering different views of the catalog
It also contains an index.html file, which is the main catalog HTML content that will be served to users in their browsers,
as well as a config.json file, which contains default and user-specified configuration settings for the catalog rendering.
These directories and files are all populated into their respective locations by the datalad catalog-create command.
Next, let’s have a look at the catalog that we just created.
7.4.4.4. Rendering a catalog locally
Since the catalog contains HTML, JavaScript, and CSS that can be viewed in any common browser (Google Chrome, Safari, Mozilla Firefox, etc), this content needs to be served.
With the serve subcommand, you can serve the content of a catalog locally via an HTTP server:
$ datalad catalog-serve --catalog data-cat
If you navigate to the data-cat location (a URL is provided in the serve command output, typically http://localhost:8000/),
the catalog should be rendered. You should see the 404 page, since there is no metadata in the catalog yet.
(Don’t worry, that will change soon!)

To stop the serving process, you can hit CTRL+C in your shell environment.
7.4.4.5. Adding catalog metadata
The catalog is, of course, only as useful as the metadata that is contained within it.
So let’s add some! This can easily be done with the catalog-add command and -m/--metadata flag:
$ datalad catalog-add --catalog <path-to-catalog> --metadata <path-to-metadata>
DataLad Catalog accepts metadata input in the multiple formats, including:
a path to a file (typically with extension
.json,.jsonl, or.txt) containing JSON lines, where each line is a single, correctly formatted, JSON object.JSON lines from STDIN
a JSON serialized string
Before we add metadata to our data-cat catalog, we’ll first introduce a few important concepts and tools.
7.4.4.6. The Catalog schema
Each JSON object provided to the Catalog in the metadata file should be structured according to the Catalog schema, which is based on JSON Schema: a vocabulary that allows you to annotate and validate JSON documents.
The implication is that you will have to format your metadata objects to conform to this standard. At the core of this standard are the concepts of a dataset and a file, which shouldn’t be surprising to anyone working with data: we have a set of files organized in some kind of hierarchy, and sets of files are often delineated from other sets of files - here we call this delineation a dataset.
There are a few core specifications of metadata objects within the context of the Catalog schema:
A metadata object can only be about a dataset or a file (its
type).Each metadata object has multiple “key/value”-pairs that describe it. For example, an object of type
datasetmight have aname(key) equal tomy_test_dataset(value), and akeywordsfield equal to the list["quick", "brown", "fox"](value). An object of typefilemight have aformat(key) equal toJSON(value).Each metadata object should have a way to identify its related dataset. For an object of type
dataset, this will be thedataset_idanddataset_versionof the actual dataset. For an object of typefile, this will be thedataset_idanddataset_versionof its parent dataset (i.e. the dataset which the file forms part of).Each metadata object of type
fileshould have apathkey for which the value specifies exactly where the file is located relative to the root directory of its parent dataset.Datasets can have subdatasets.
The Catalog schema specifies exactly which fields are required and which data types
are accepted for each key/value-pair. For an improved understanding of the Catalog schema,
you can inspect the JSON documents here (jsonschema_*).
7.4.4.7. Sample metadata
Let’s look at a toy example of metadata that adheres to the Catalog schema.
First a dataset:
{
    "type": "dataset",
    "dataset_id":"5df8eb3a-95c5-11ea-b4b9-a0369f287950",
    "dataset_version":"dae38cf901995aace0dde5346515a0134f919523",
    "name": "My toy dataset",
    "short_name": "My toy dataset",
    "description": "Lorem ipsum dolor sit amet, consectetur adipiscing elit. Phasellus nec justo tellus. Nunc sagittis eleifend magna, eu blandit arcu tincidunt eu. Mauris pharetra justo nec volutpat euismod. Curabitur bibendum vitae nunc a pharetra. Donec non rhoncus risus, ac consequat purus. Pellentesque ultricies ut enim non luctus. Sed viverra dolor enim, sed blandit lorem interdum sit amet. Aenean tincidunt et dolor sit amet tincidunt. Vivamus in sollicitudin ligula. Curabitur volutpat sapien erat, eget consectetur mauris dapibus a. Phasellus fringilla justo ligula, et fringilla tortor ullamcorper id. Praesent tristique lacus purus, eu convallis quam vestibulum eget. Donec ullamcorper mi neque, vel tincidunt augue porttitor vel.",
    "doi": "",
    "url": ["https://github.com/jsheunis/multi-echo-super"],
    "license": {
      "name": "CC BY 4.0",
      "url": "https://creativecommons.org/licenses/by/4.0/"
    },
    "authors": [
        {
            "givenName":"Stephan",
            "familyName":"Heunis",
        }
    ],
    "keywords": ["lorum", "ipsum", "foxes"],
    "funding": [
        {
            "name":"Stephans Bank Account",
            "identifier":"No. 42",
            "description":"Nothing to see here"
        }
    ],
    "metadata_sources": {
      "key_source_map": {},
      "sources": [
         {
            "source_name": "stephan_manual",
            "source_version": "1",
            "source_parameter": {},
            "source_time": 1652340647.0,
            "agent_name": "Stephan Heunis",
            "agent_email": ""
         }
     ]
   }
}
And then two files of the dataset:
 {
    "type": "file"
    "dataset_id": "5df8eb3a-95c5-11ea-b4b9-a0369f287950",
    "dataset_version": "dae38cf901995aace0dde5346515a0134f919523",
    "contentbytesize": 1403
    "path": "README",
    "metadata_sources": {
       "key_source_map": {},
       "sources": [
          {
             "source_name": "stephan_manual",
             "source_version": "1",
             "source_parameter": {},
             "source_time": 1652340647.0,
             "agent_name": "Stephan Heunis",
             "agent_email": ""
          }
      ]
    }
}
{
    "type": "file"
    "dataset_id": "5df8eb3a-95c5-11ea-b4b9-a0369f287950",
    "dataset_version": "dae38cf901995aace0dde5346515a0134f919523",
    "contentbytesize": 15572
    "path": "main_data/main_results.png",
    "metadata_sources": {
       "key_source_map": {},
       "sources": [
          {
             "source_name": "stephan_manual",
             "source_version": "1",
             "source_parameter": {},
             "source_time": 1652340647.0,
             "agent_name": "Stephan Heunis",
             "agent_email": ""
          }
      ]
    }
}
7.4.4.8. Validating your metadata
For convenience during metadata setup and catalog generation, the catalog-validate
command that let’s you test whether your metadata conforms to the
catalog schema before adding it. Let’s test it on the toy metadata.
First we’ll put the metadata into a file, which is the format currently accepted when adding metadata to a catalog:
$ touch toy_metadata.jsonl
$ echo '{ "type": "dataset", "dataset_id": "5df8eb3a-95c5-11ea-b4b9-a0369f287950", "dataset_version": "dae38cf901995aace0dde5346515a0134f919523", "name": "My toy dataset", "short_name": "My toy dataset", "description": "Lorem ipsum dolor sit amet, consectetur adipiscing elit. Phasellus nec justo tellus. Nunc sagittis eleifend magna, eu blandit arcu tincidunt eu. Mauris pharetra justo nec volutpat euismod. Curabitur bibendum vitae nunc a pharetra. Donec non rhoncus risus, ac consequat purus. Pellentesque ultricies ut enim non luctus. Sed viverra dolor enim, sed blandit lorem interdum sit amet. Aenean tincidunt et dolor sit amet tincidunt. Vivamus in sollicitudin ligula. Curabitur volutpat sapien erat, eget consectetur mauris dapibus a. Phasellus fringilla justo ligula, et fringilla tortor ullamcorper id. Praesent tristique lacus purus, eu convallis quam vestibulum eget. Donec ullamcorper mi neque, vel tincidunt augue porttitor vel.", "doi": "", "url": "https://github.com/jsheunis/multi-echo-super", "license": { "name": "CC BY 4.0", "url": "https://creativecommons.org/licenses/by/4.0/" }, "authors": [ { "givenName": "Stephan", "familyName": "Heunis"} ], "keywords": [ "lorum", "ipsum", "foxes" ], "funding": [ { "name": "Stephans Bank Account", "identifier": "No. 42", "description": "Nothing to see here" } ], "metadata_sources": { "key_source_map": {}, "sources": [ { "source_name": "stephan_manual", "source_version": "1", "source_parameter": {}, "source_time": 1652340647.0, "agent_name": "Stephan Heunis", "agent_email": "" } ] } }' >> toy_metadata.jsonl
$ echo '{ "type": "file", "dataset_id": "5df8eb3a-95c5-11ea-b4b9-a0369f287950", "dataset_version": "dae38cf901995aace0dde5346515a0134f919523", "contentbytesize": 1403, "path": "README", "metadata_sources": { "key_source_map": {}, "sources": [ { "source_name": "stephan_manual", "source_version": "1", "source_parameter": {}, "source_time": 1652340647.0, "agent_name": "Stephan Heunis", "agent_email": "" } ] } }' >> toy_metadata.jsonl
$ echo '{ "type": "file", "dataset_id": "5df8eb3a-95c5-11ea-b4b9-a0369f287950", "dataset_version": "dae38cf901995aace0dde5346515a0134f919523", "contentbytesize": 15572, "path": "main_data/main_results.png", "metadata_sources": { "key_source_map": {}, "sources": [ { "source_name": "stephan_manual", "source_version": "1", "source_parameter": {}, "source_time": 1652340647.0, "agent_name": "Stephan Heunis", "agent_email": "" } ] } }' >> toy_metadata.jsonl
Then we can validate the metadata in this file:
$ datalad catalog-validate --metadata toy_metadata.jsonl
catalog_validate(ok): /home/me/catalog
catalog_validate(ok): /home/me/catalog
catalog_validate(ok): /home/me/catalog
Great! This confirms that we have valid metadata :)
Take note that this validator also runs internally whenever metadata is added to the catalog, so there is no specific need to run validation explicitly unless you want you.
7.4.4.9. Adding metadata
Finally, we can add metadata!
$ datalad catalog-add --catalog data-cat --metadata toy_metadata.jsonl
catalog_add(ok): data-cat [Metadata record successfully added to catalog (dataset: dataset_id=5df8eb3a-95c5-11ea-b4b9-a0369f287950, dataset_version=dae38cf9✂SHA1)]
catalog_add(ok): data-cat [Metadata record successfully updated in catalog (filetree of dataset: dataset_id=5df8eb3a-95c5-11ea-b4b9-a0369f287950, dataset_version=dae38cf9✂SHA1)]
catalog_add(ok): data-cat [Metadata record successfully updated in catalog (filetree of dataset: dataset_id=5df8eb3a-95c5-11ea-b4b9-a0369f287950, dataset_version=dae38cf9✂SHA1)]
The catalog-add(ok) result indicates that our metadata was added successfully to the catalog.
You can inspect this by looking at the content of the metadata directory inside the catalog:
$ tree data-cat/metadata
data-cat/metadata
└── 5df8eb3a-95c5-11ea-b4b9-a0369f287950
    └── dae38cf9✂SHA1
        ├── 449
        │   └── 268b13a1c869555f6c2f6e66d3923.json
        └── 578
            └── b4ba64a67d1d99cbcf06d5d26e0f6.json

4 directories, 2 files
Where previously the metadata directory contained nothing, it now has several subdirectories
and two .json-files. Note, first, that the first two recursive subdirectory names correspond
respectively to the dataset_id and dataset_version of the dataset in the toy metadata
that we added to the catalog. This supports the DataLad Catalog’s ability to identify specific
datasets and their files by ID and version in order to update the catalog easily (and, when it
comes to decentralized contribution, without conflicts). The subdirectories further down the
hierarchy, as well as the filenames, are just hashes of the path to the specific directory node
relative to the parent dataset. Let’s look at the content of these files:
$ cat data-cat/metadata/5df8eb3a-95c5-11ea-b4b9-a0369f287950/dae38cf901995aace0dde5346515a0134f919523/449/268b13a1c869555f6c2f6e66d3923.json | jq .
$ cat data-cat/metadata/5df8eb3a-95c5-11ea-b4b9-a0369f287950/dae38cf901995aace0dde5346515a0134f919523/578/b4ba64a67d1d99cbcf06d5d26e0f6.json | jq .
{
  "type": "dataset",
  "dataset_id": "5df8eb3a-95c5-11ea-b4b9-a0369f287950",
  "dataset_version": "dae38cf9✂SHA1",
  "children": [
      "dataset_id": "5df8eb3a-95c5-11ea-b4b9-a0369f287950",
      "dataset_version": "dae38cf9✂SHA1"
    }
      ],
      "url": [
        "stephan_manual"
      ],
      "license": [
        "stephan_manual"
      ],
      "authors": [
        "stephan_manual"
      ],
      "keywords": [
  "name": "My toy dataset",
  "short_name": "My toy dataset",
  "description": "Lorem ipsum dolor sit amet, consectetur adipiscing elit. Phasellus nec justo tellus. Nunc sagittis eleifend magna, eu blandit arcu tincidunt eu. Mauris pharetra justo nec volutpat euismod. Curabitur bibendum vitae nunc a pharetra. Donec non rhoncus risus, ac consequat purus. Pellentesque ultricies ut enim non luctus. Sed viverra dolor enim, sed blandit lorem interdum sit amet. Aenean tincidunt et dolor sit amet tincidunt. Vivamus in sollicitudin ligula. Curabitur volutpat sapien erat, eget consectetur mauris dapibus a. Phasellus fringilla justo ligula, et fringilla tortor ullamcorper id. Praesent tristique lacus purus, eu convallis quam vestibulum eget. Donec ullamcorper mi neque, vel tincidunt augue porttitor vel.",
  "url": "https://github.com/jsheunis/multi-echo-super",
  "license": {
    "name": "CC BY 4.0",
    "url": "https://creativecommons.org/licenses/by/4.0/"
  },
  "authors": [
    {
      "givenName": "Stephan",
      "familyName": "Heunis"
    }
  ],
  "keywords": [
    "lorum",
    "ipsum",
    "foxes"
  ],
  "funding": [
    {
      "name": "Stephans Bank Account",
      "identifier": "No. 42",
      "description": "Nothing to see here"
    }
  ]
}
{
As you can see, the content of these files is very similar to the original toy data, but slightly transformed. This transformation creates a structure that is easier for the associated browser application to read and render. Additionally, structuring data into metadata files that represent nodes in the dataset hierarchy (i.e. a datasets or directories) allows the browser application to only access the data in those metadata files whenever the user selects the applicable node. This saves loading time which makes the user experience more seamless.
7.4.4.10. Viewing a particular dataset
So, that was everything that happened behind the scenes during the datalad catalog-add procedure,
but what does our updated catalog look like? Let’s take a look. If you serve the catalog again
and navigate to the localhost, you should see… no change?!
The reason for this is that we didn’t specify the details of the particular dataset that we want to view, and there is also no default specified for the catalog.
If we want to view the specific dataset that we just added to the catalog, we can specify its
dataset_id and dataset_version by appending them to the URL in the format:
<catalog-url>/#/dataset/<dataset_id>/<dataset_version>
This makes it possible to view any uniquely identifiable dataset by navigating to a unique URL.
Let’s try it with our toy example. Navigate to the localhost (the 404 page should be displayed), append:
/#/dataset/5df8eb3a-95c5-11ea-b4b9-a0369f287950/dae38cf901995aace0dde5346515a0134f919523
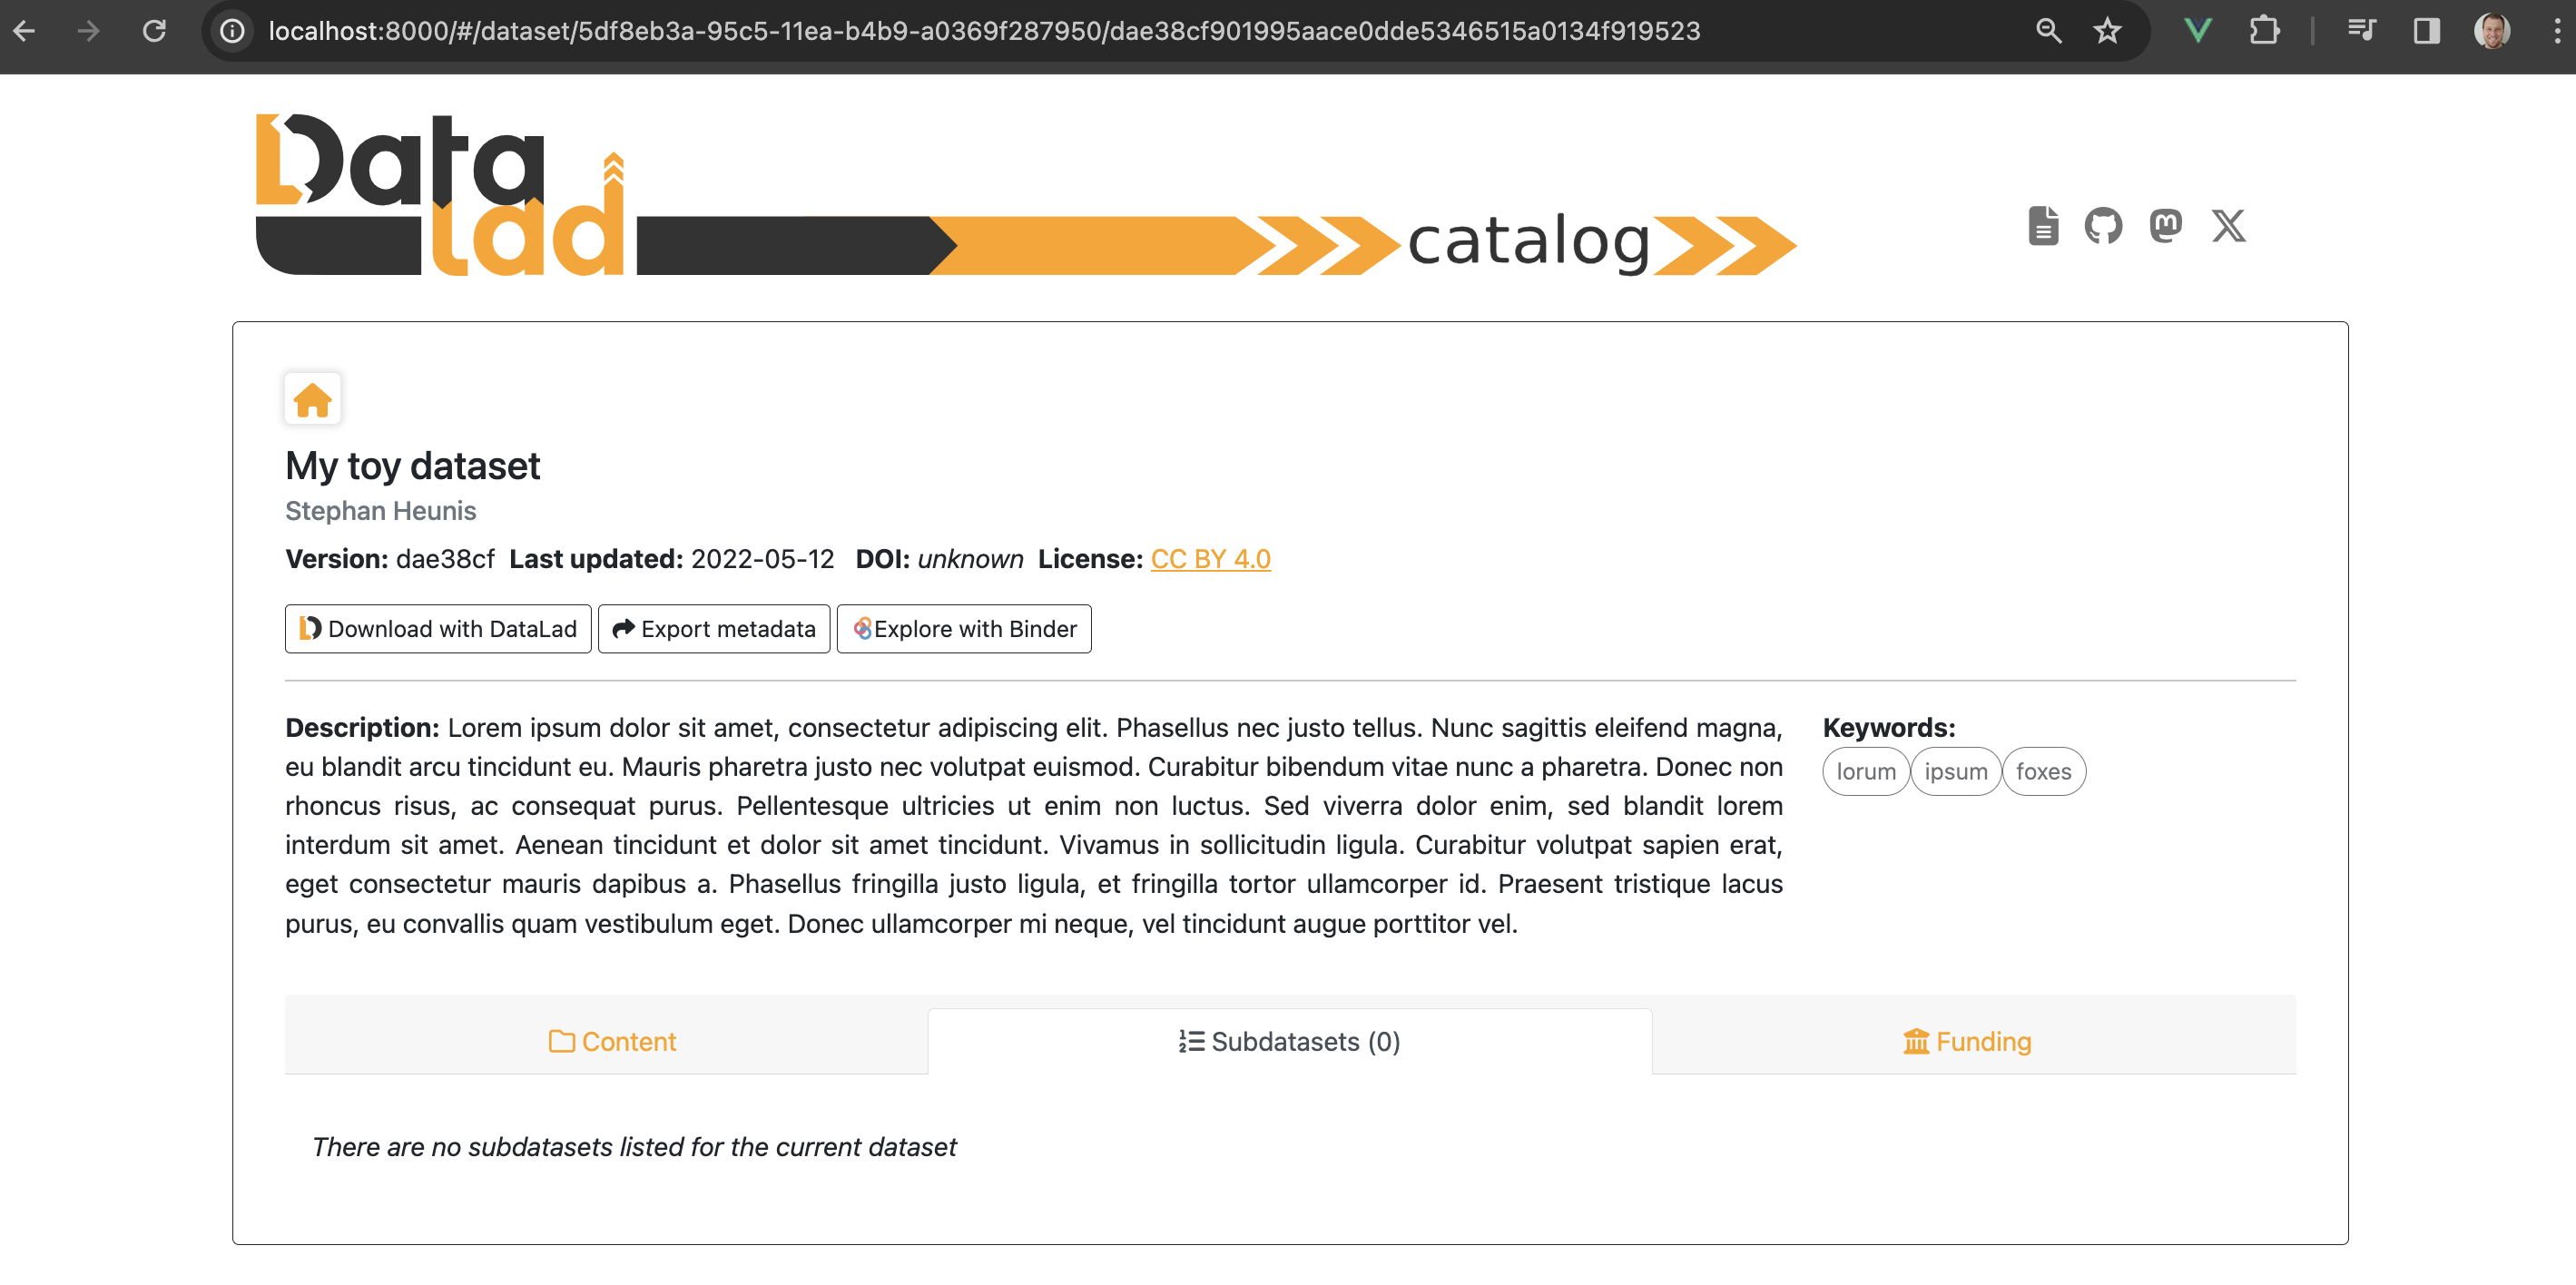
to the end of the URL, and hit ENTER/RETURN. You should see something like this:

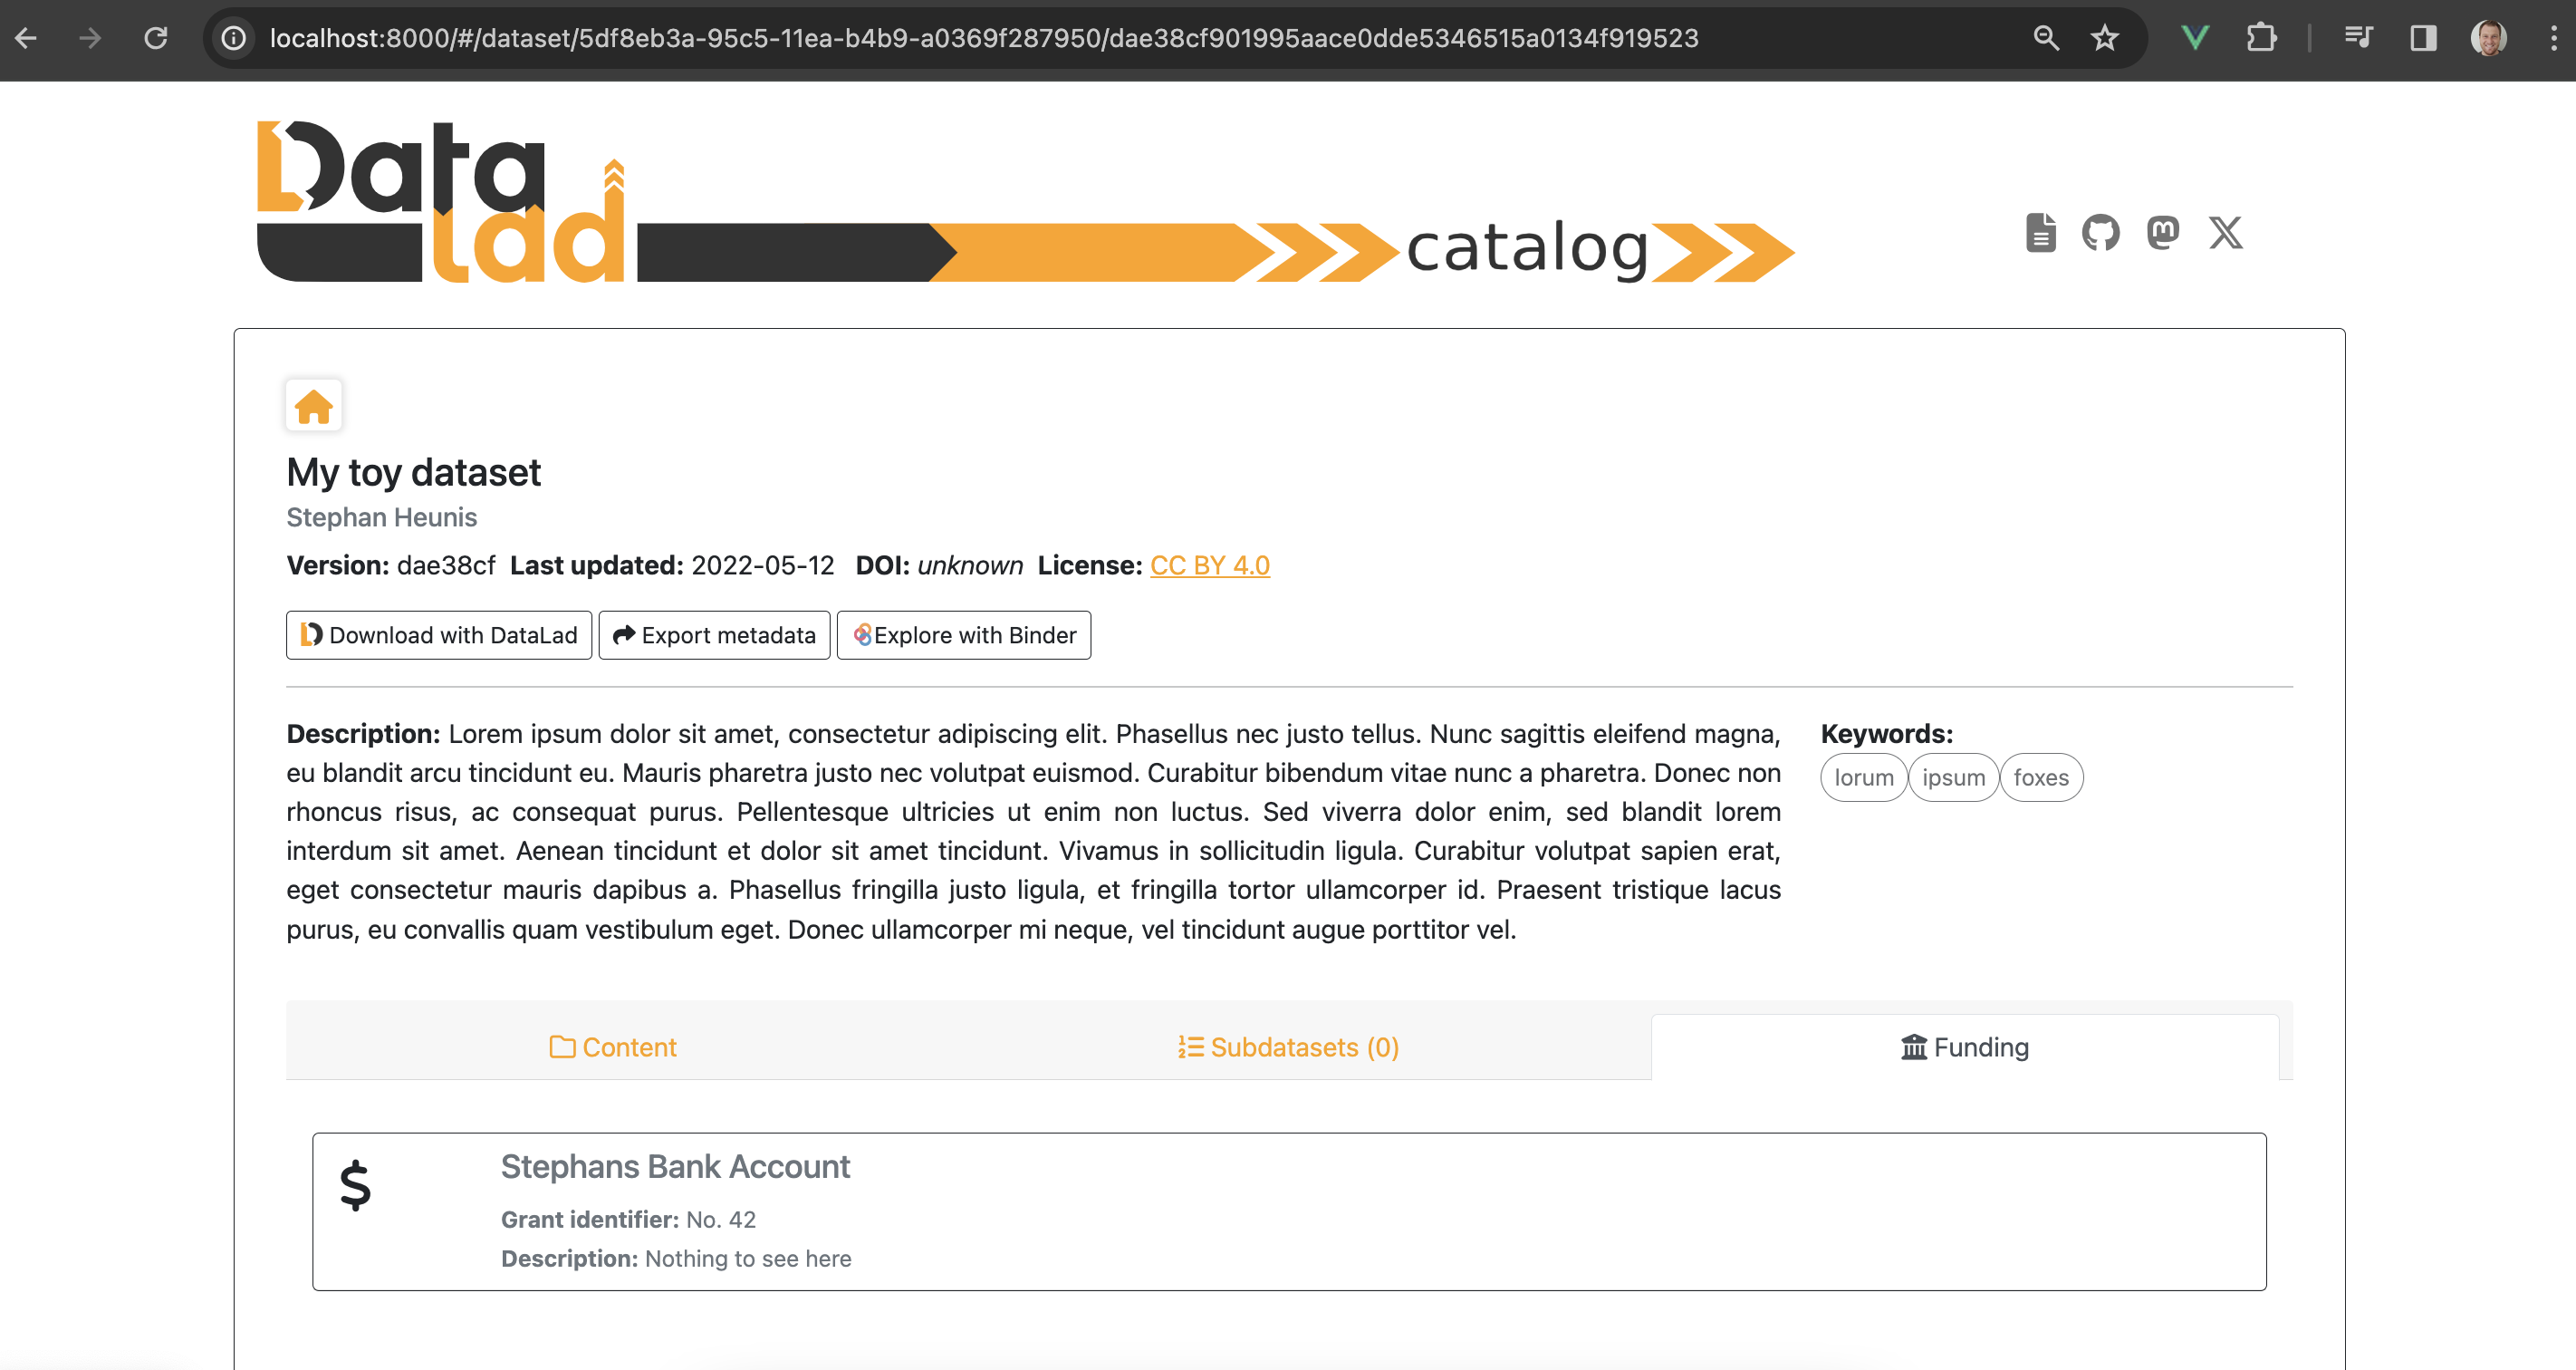
This is the dataset view, with the content tab (auto-)selected. This view displays all the main content related to the dataset that was provided by the metadata, and allows the user further functionality like downloading the dataset with DataLad, downloading the metadata, filtering subdatasets by keyword, browsing files, and viewing extended attributes such as funding information related to the dataset. Below are two more views, the first with the subdatasets tab selected, and the second with the funding tab selected.
7.4.4.11. Setting the catalog home page
When one navigates to a specific catalog’s root address, i.e. without a dataset_id and dataset_version
specified in the URL, the browser application checks if a home page is specified for the catalog. If not,
it renders the 404 page.
The specification of a home page could be useful for cases where the catalog, when navigated to, should always render the top-level list of available datasets in the catalog (provided by the metadata as subdatasets to the superdataset).
Let’s add our toy dataset as the catalog’s home page, using the catalog-set command
with the home property, and additionally specifying the dataset’s dataset_id
(-i/--dataset-id flag) and dataset_version (-v/--dataset-version flag):
$ datalad catalog-set --catalog data-cat --dataset-id 5df8eb3a-95c5-11ea-b4b9-a0369f287950 --dataset-version dae38cf901995aace0dde5346515a0134f919523 home
catalog_set(ok): data-cat [Home page successfully set to: dataset_id=5df8eb3a-95c5-11ea-b4b9-a0369f287950, dataset_version=dae38cf9✂SHA1.]
The catalog catalog-set(ok) result shows that the superdataset was successfully set
for the catalog, and you will now also be able to see an additional super.json file in the
catalog metadata directory. The content of this file is a simple JSON object specifying the
main dataset’s dataset_id and dataset_version:
$ cat data-cat/metadata/super.json | jq .
{
  "dataset_id": "5df8eb3a-95c5-11ea-b4b9-a0369f287950",
  "dataset_version": "dae38cf9✂SHA1"
}
Now, when one navigates to the catalog’s root address without a dataset_id and
dataset_version specified in the URL, the browser application will find that a
default dataset is indeed specified for the catalog, and it will navigate to that specific
dataset view!
7.4.4.12. Catalog configuration
A useful feature of the catalog process is to be able to configure certain properties according
to your preferences. This is done with help of a config file (in either JSON or YAML format)
and the -F/--config-file flag during catalog generation. DataLad Catalog provides a default
config file with the following content:
$ cat data-cat/config.json | jq .
{
  "catalog_name": "DataCat",
  "logo_path": "",
  "link_color": "#fba304",
  "link_hover_color": "#af7714",
  "social_links": {
    "about": null,
    "documentation": "https://docs.datalad.org/projects/catalog/en/latest/",
    "github": "https://github.com/datalad/datalad-catalog",
    "mastodon": "https://fosstodon.org/@datalad",
    "x": "https://x.com/datalad"
  },
  "dataset_options": {
    "include_metadata_export": true
  },
  "property_sources": {
    "dataset": {
      "dataset_id": {},
      "dataset_version": {},
      "type": {},
      "children": {
        "rule": "merge",
        "source": "any"
      },
      "name": {},
      "short_name": {},
      "description": {},
      "doi": {},
      "url": {
        "rule": "merge",
        "source": "any"
      },
      "authors": {
        "rule": "merge",
        "source": "any"
      },
      "keywords": {
        "rule": "merge",
        "source": "any"
      },
      "license": {},
      "funding": {
        "rule": "merge",
        "source": "any"
      },
      "publications": {
        "rule": "merge",
        "source": "any"
      },
      "subdatasets": {
        "rule": "merge",
        "source": "any"
      },
      "additional_display": {
        "rule": "merge",
        "source": "any"
      },
      "top_display": {
        "rule": "merge",
        "source": "any"
      }
    }
  }
}
If no config file is supplied to the catalog-create command, the default is used.
Let’s create a new toy catalog with a new config, specifying a new name, a new logo, and new colors for the links.
This will be the content of the config file, in YAML format:
$ cat << EOT >> cat_config.yml
# Catalog properties
catalog_name: "Toy Catalog"

# Styling
logo_path: "datalad_logo_funky.svg" # path to logo
link_color: "#32A287" # hex color code
link_hover_color: "#A9FDAC" # hex color code

# Handling multiple metadata sources
property_sources:
  dataset: {}

EOT
We’ll ensure that the new custom logo is available locally:
$ wget -q -O datalad_logo_funky.svg https://raw.githubusercontent.com/datalad/tutorials/5e5fc0a4/notebooks/catalog_tutorials/test_data/datalad_logo_funky.svg
Now we can run all the necessary subcommands for the catalog generation process:
$ datalad catalog-create -c custom-cat -m toy_metadata.jsonl -F cat_config.yml
$ datalad catalog-set -c custom-cat -i 5df8eb3a-95c5-11ea-b4b9-a0369f287950 -v dae38cf901995aace0dde5346515a0134f919523 home
catalog_create(ok): custom-cat [Catalog successfully created at: custom-cat]
catalog_add(ok): custom-cat [Metadata record successfully added to catalog (dataset: dataset_id=5df8eb3a-95c5-11ea-b4b9-a0369f287950, dataset_version=dae38cf9✂SHA1)]
catalog_add(ok): custom-cat [Metadata record successfully updated in catalog (filetree of dataset: dataset_id=5df8eb3a-95c5-11ea-b4b9-a0369f287950, dataset_version=dae38cf9✂SHA1)]
catalog_add(ok): custom-cat [Metadata record successfully updated in catalog (filetree of dataset: dataset_id=5df8eb3a-95c5-11ea-b4b9-a0369f287950, dataset_version=dae38cf9✂SHA1)]
catalog_set(ok): custom-cat [Home page successfully set to: dataset_id=5df8eb3a-95c5-11ea-b4b9-a0369f287950, dataset_version=dae38cf9✂SHA1.]
To test this, serve the new custom catalog and navigate to the localhost to view it.
You should see the following:
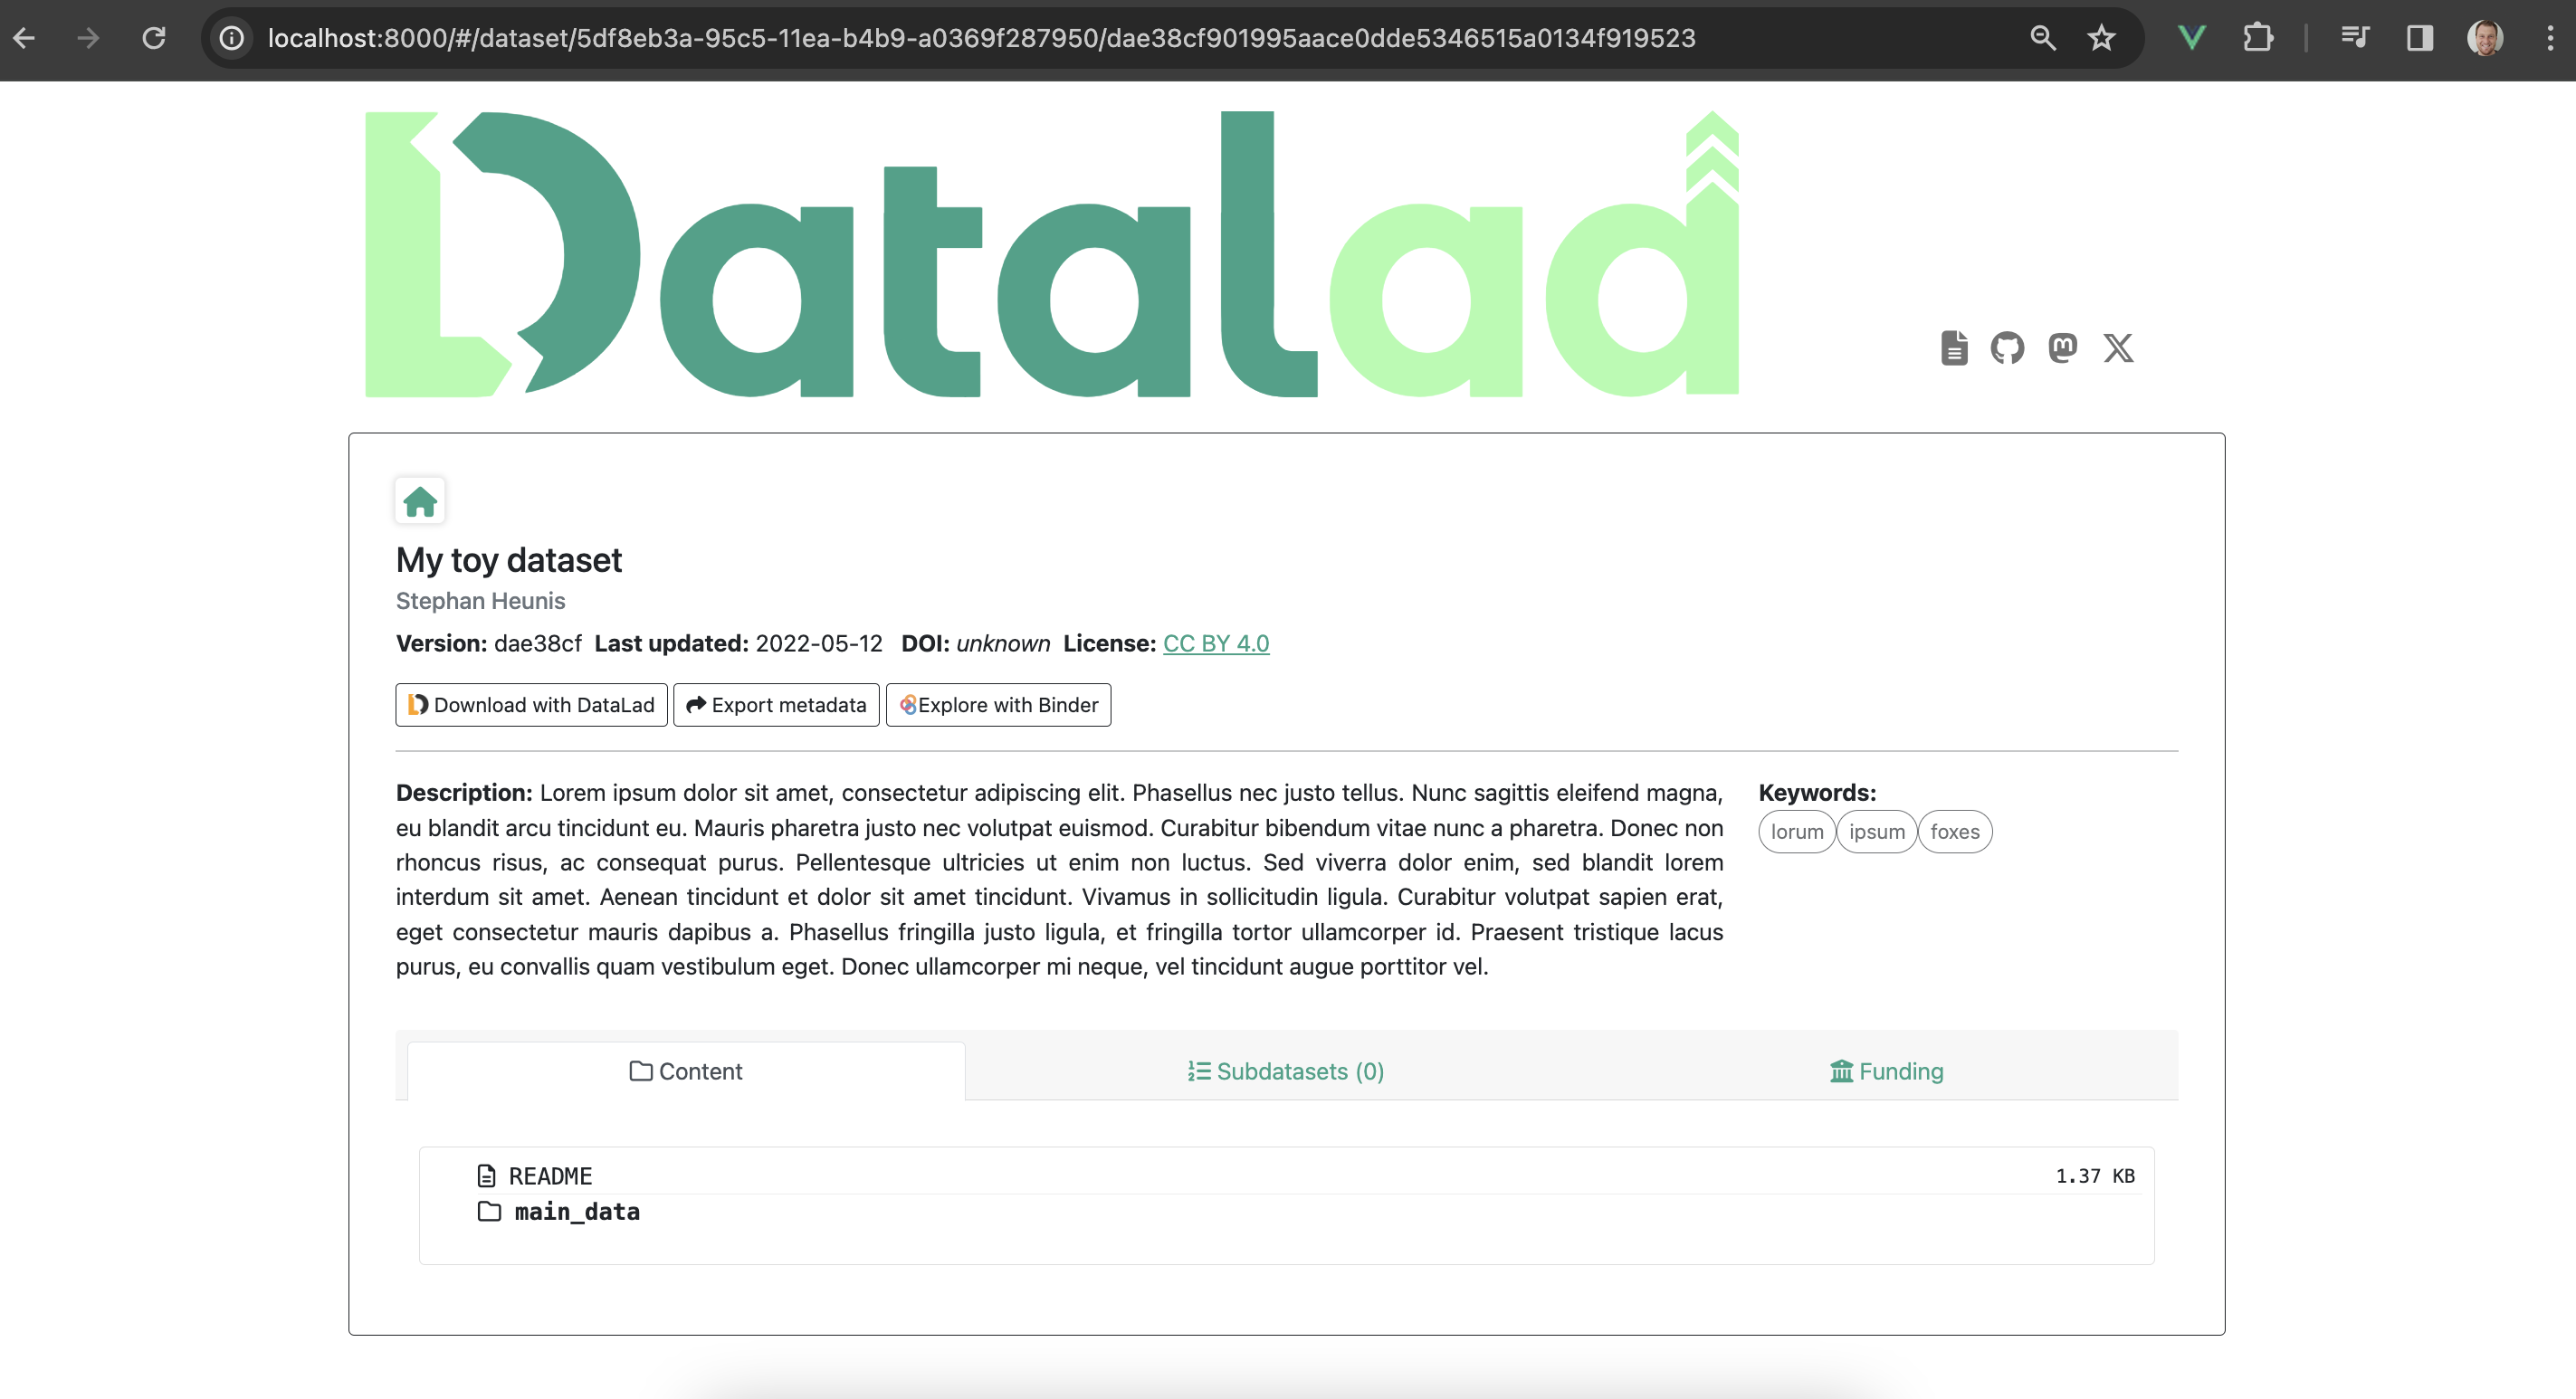
Well done! You have just configured your catalog with a custom logo and color scheme! (apologies if you find the colors a bit loud :-P)
The configuration will also come in handy when there are more advanced forms of metadata
in a catalog, especially when multiple sources of metadata are available for the same dataset.
In such cases, one might want to specify or prioritize how these multiple sources are displayed,
and the catalog configuration allows for that via specification of the property_sources key.
Find out more in the dedicated documentation.
7.4.4.13. And that’s it!
For now… :)
You now know how to install DataLad Catalog and how to employ its basic features in order to create and configure a browser-based catalog from structured metadata. Congrats!
You might want to explore further to find out how to build more advanced metadata handling and catalog generation workflows, or to learn how to use additional features. If so, please visit DataLad Catalog’s user documentation.